Python For Structural Engineers
The following post is an introductory tutorial for Python.
My sense is that Python will eventually become a pre-requisite skill for our profession, similar to how most engineers are expected to know Excel - which is already bursting at the seams from modern computation demands 1. I don’t think Excel is going away2, but it’s clear the heavier computation will shift to Python. AI adoption will push more and more engineers towards reading, writing, and editing python scripts, so it’s worthwhile to invest some time to learn at least the basic vocabulary so you can prompt better3.
Luckily for us, it’s optional that we learn the intricacies algorithms and data structures. For practical purposes, it’s more important that we know when to call list.sort() rather than implementing Quick Sort ourselves 4. The scope of what we need to learn is smaller than you think! I hope this fact encourages more people to dive in.
What all that being said, let’s get started from the absolute beginning: installing python.
1.0 Installation
1.1 Python
There are many different ways to work with python. I recommend the following for beginners:
- Python: install from python.org
- IDE: Spyder
- Packages: pip
- Virtual Environment: venv
I believe this is the most direct and pedagogically optimal combination. Other options may be more efficient, but they come at a cost of having layers of abstraction that may confuse rather than elucidate. As you become more proficient, you may wish to explore other options (e.g. vscode, pycharm, poetry, uv, conda). Here’s the step-by-step instruction for installing python:
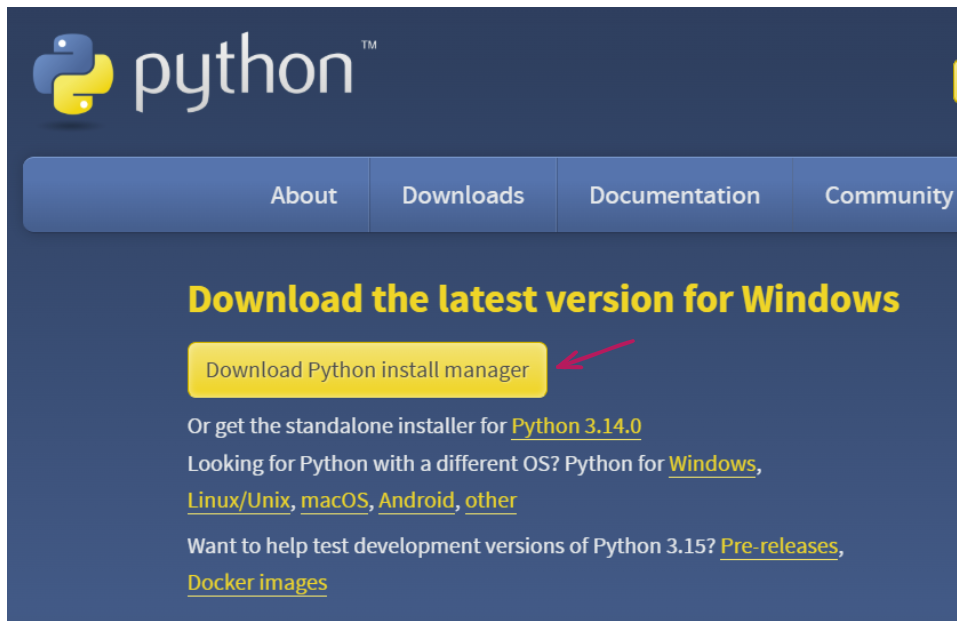
- Install the Python Install Manager from python.org: https://www.python.org/downloads/. The python install manager (PIM) was introduced in python 3.13 and will be the default way to install python moving forward.
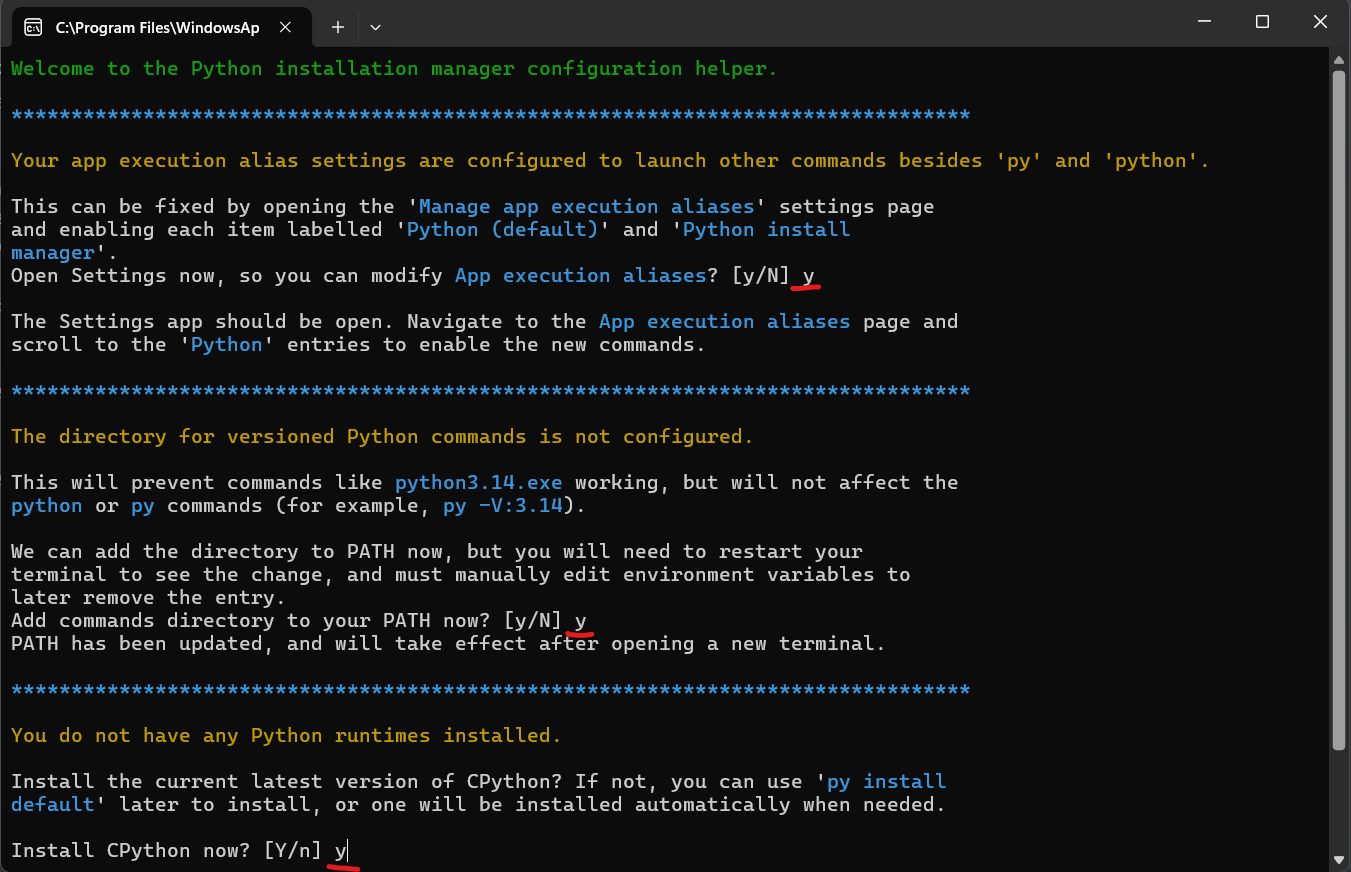
- Run the installer and enter [y] for everything. Yes to check app execution alias. Yes to add to PATH. Yes to install newest version of CPython
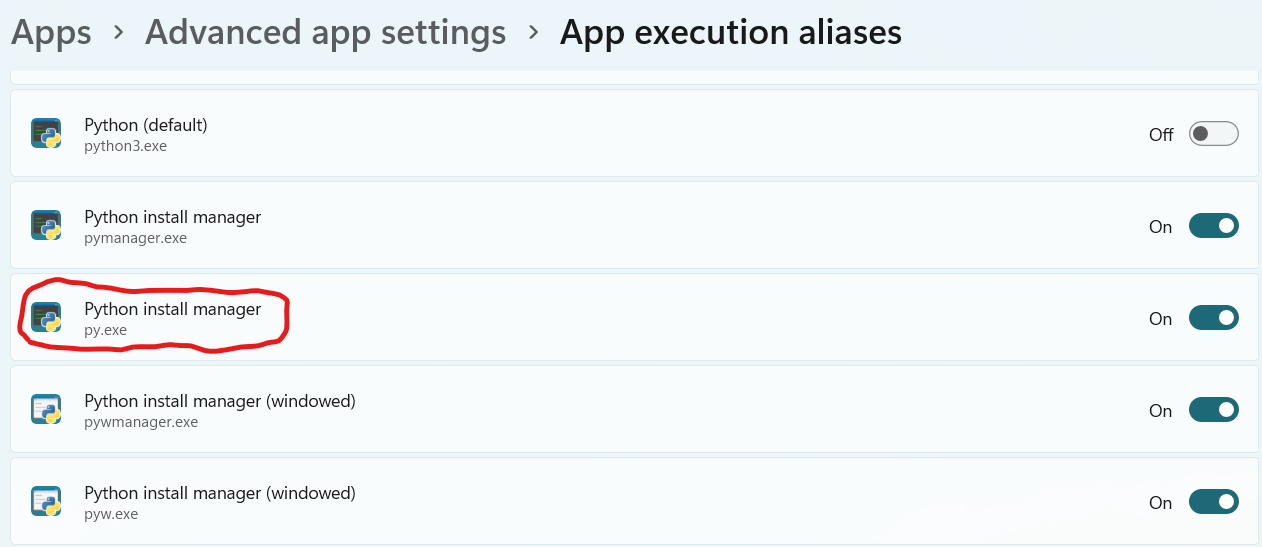
- In the app execution alias settings which should have popped up. Make sure alias for “py.exe” is turned on.
- In a new terminal window, type
pyand hit enter to open a Python console. If you see this screen, you are ready to code. Try typing something likeprint("hello")or1 + 1.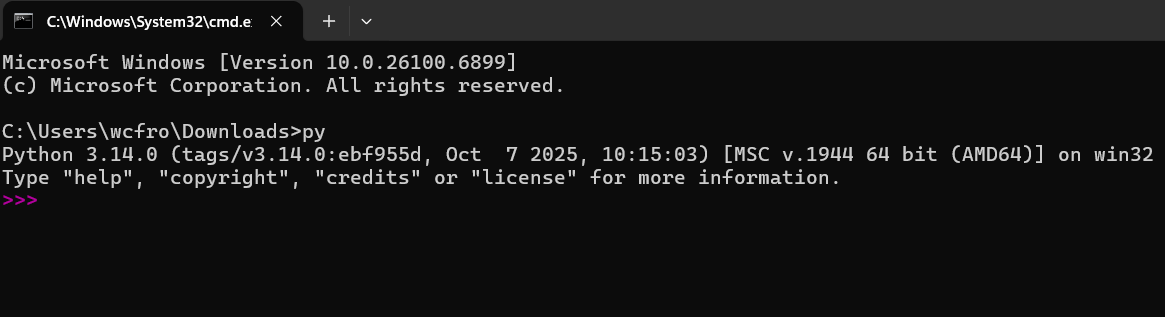
- To exit the Python console and return to terminal, type
exit()or pressCTRL+Zand press enter. - I recommend using a more stable versions of python. If version 3.14 is latest, you should install version 3.13. Let’s do that now:
py install 3.13 default. The default flag makes 3.13 the default version when usingpy.
Python is cool by itself, but what makes it amazing is the vast collection of free and open-source packages (e.g. numpy, pandas, comtypes, openseespy, etc.). Rather than installing all your packages to your global python installation, the best practice is to set up separate environments for each project. Let’s go through that next.
1.2 Virtual Environment
Anytime you start a new python project, the first thing you should do is to create a virtual environments (venv). Think of a venv as a sandboxed copy of python that lives in your project folder. Here’s an illustration of what I mean:
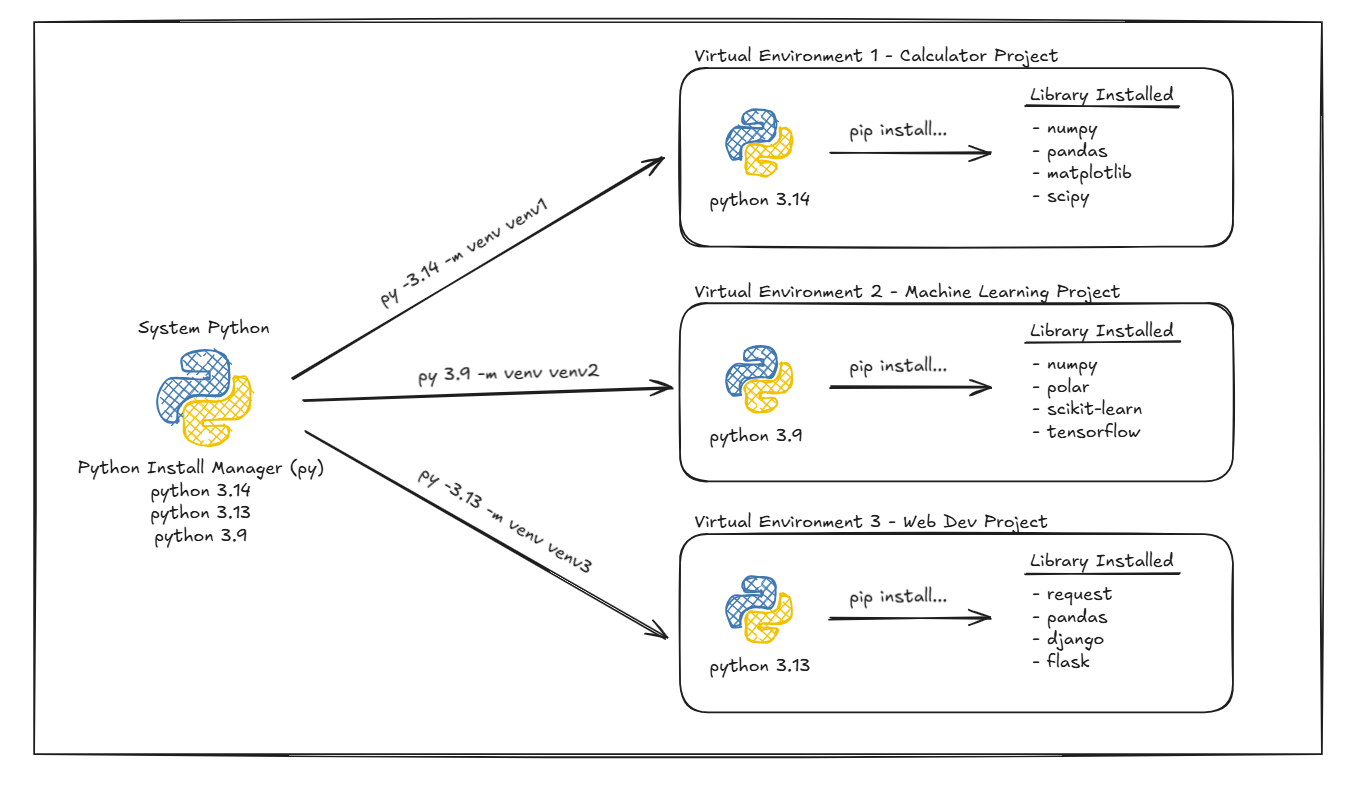 Python virtual environment (venv) and pip package manager
Instruction for setting up a virtual environment and installing packages:
- Create a new project folder.
- Open terminal. A nice shortcut is to type
cmdin the windows explorer address bar. - Create a new virtual environment by typing
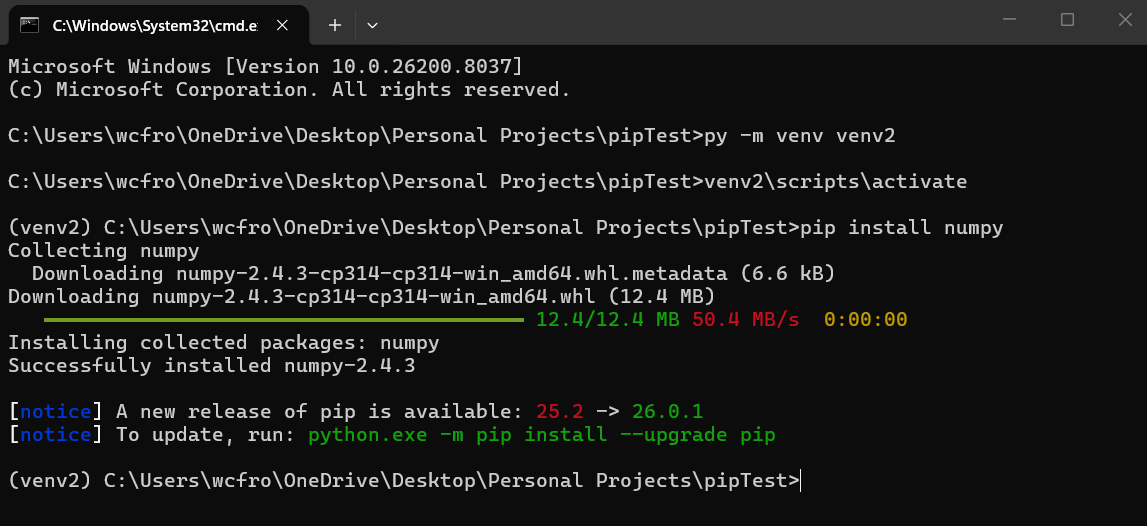
py -m venv my_first_venv. You can name it anything you like. Most people go with “venv” or “.venv”. This command will create a new folder in your project directory called “my_first_venv”. Inside, you will find a copy of python as well as any packages you might install later. - Activate your venv by typing:
my_first_venv\scripts\activate(note the left-leaning backslash “\” on Windows). Now you should see a (my_first_venv) prefix in your terminal. - Install packages using pip. For this tutorial, let’s install:
pip install numpy pandas comtypes matplotlib spyder-kernels. - If everything worked correctly, you should see something like the snippet below. Repeat step 3 and 4 if you ever need to install other packages in the future.
One last thing thing: before we start coding, we’ll need an integrated developer environment (IDE) - a fancy word for text editor with extra features.
1.3 Spyder IDE
Python is a general-purpose programming language, which means there are many ways to work with it.
- Software developers prefer using IDE like (Pycharm, Vscode, Spyder)
- Data scientists prefer using notebooks like (jupyter or Colab)
- System admins prefer using CLI or text editor like (sublime, atom, notepad++, vim)
For this tutorial, we will use a very beginner-friendly IDE called Spyder. I like Spyder because it is simple and has the best variable explorer - which is important because it makes coding more approachable and feels less like a black box. Spyder also resembles MATLAB which is a bonus for those of us who learned it in school.
I purposefully picked a barebone IDE without any AI features. Our goal is to learn something new. Don’t let AI write any code for you at this time. There are no deadlines and you are not subject to some productivity metric.
- Install Spyder by going to https://www.spyder-ide.org/. Pick all default options during installation.
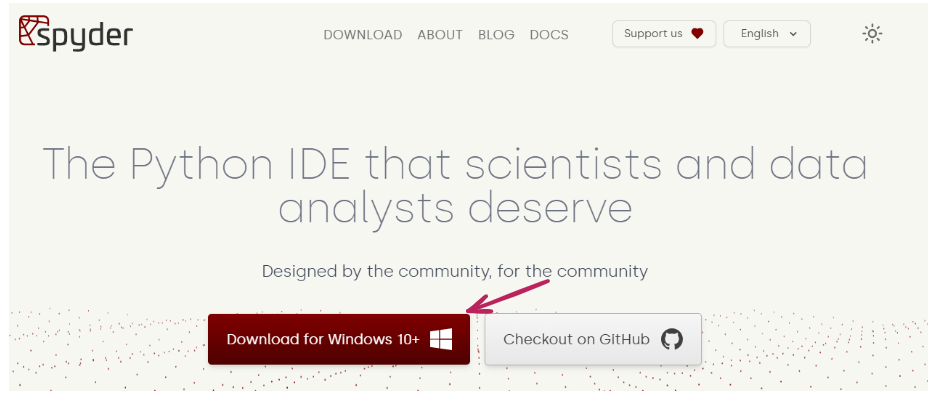
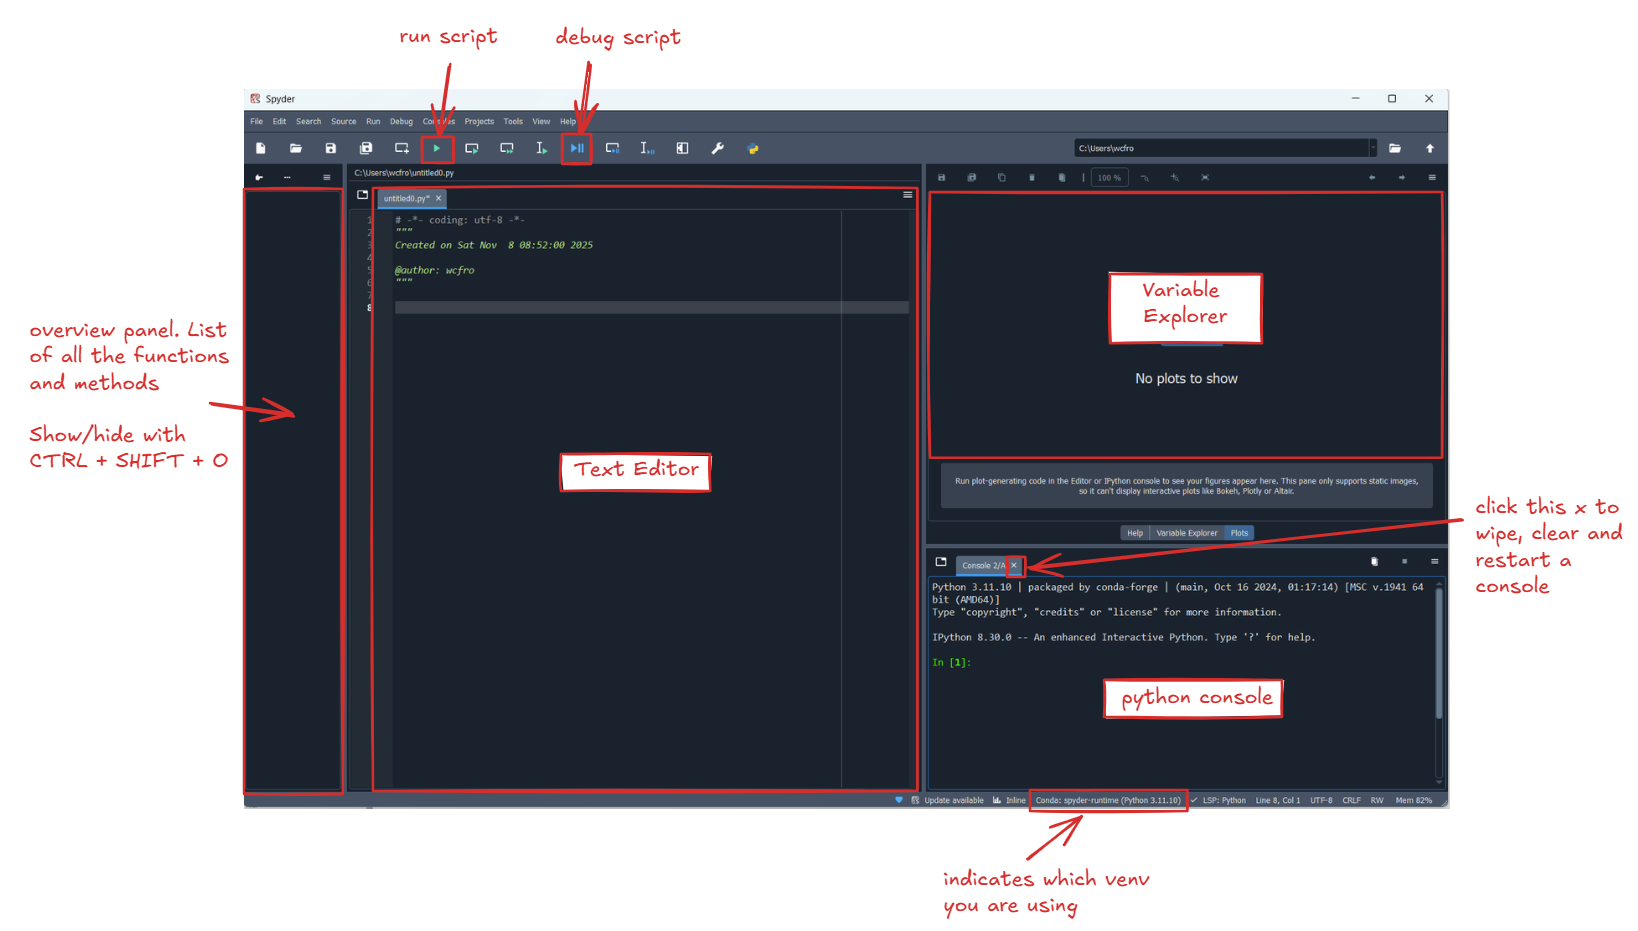
- Open Spyder IDE. Here are the things I use most often:
- Link Spyder with your venv by going to Tools > Preferences > Python interpreter:
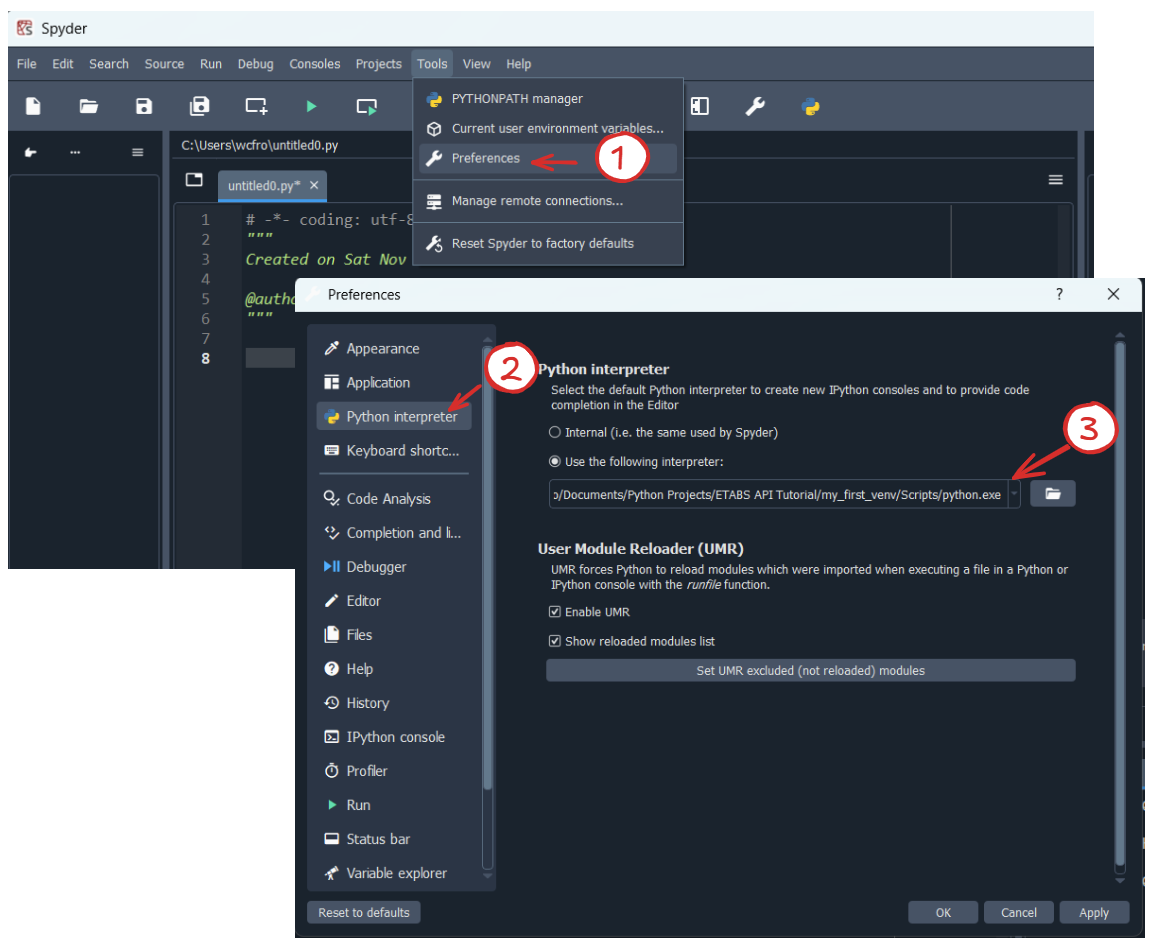
- Restart the python console on the bottom right by clicking on the little [x]. If everything is set up correctly, you should see your venv displayed on the bottom right corner.
- Create a new script called “main.py”, save it to your project folder. Copy this illustrative “hello world” script and try running it. Tinker around. You are officially a python programmer.
import numpy
import pandas
import comtypes.client

CONSTANT_A = 386.1

def main():
    print("hello world! Our script starts here")
    answer = add_function(a=1, b=1)
    print(f"1 + 1 is equal to: {answer}")
    return answer

def add_function(a, b):
    """This function returns the sum of a and b"""
    var = a + b
    return var

# Boiler plate code to call main() and avoiding global namespace pollution.
if __name__ == '__main__':
    MAIN_RETURN = main()
2.0 Python Cheat Sheet
There are plenty of excellent python tutorials on the internet, I have no desire in duplicating this effort, and I doubt I have much to add. I recommend going through a few courses on Coursera, Udemy, or YouTube. After that, my advice is to quickly transition to project-based learning. Try to shoehorn python into everything you do: from personal project to tasks at work. If something is boring and repetitive, see if you can automate it with python.
I’ve included my personal Python cheat sheet below. You should also make your own.
2.1 Project Setup
- Python Install Manager (PIM):
py install 3.13- install pythonpy- start python (default version)py -3.11- start python (specific version)setx PYTHON_MANAGER_DEFAULT "3.13"- set default versionspy list- show all installed python on your computer
- Setting up virtual environments:
py -m venv .venv- create a virtual environment called .venv.venv\scripts\activate- activate venv
- Installing packages into the activated venv:
pip install numpy- installing packages (e.g. numpy)pip list- show all installed packagespip freeze > requirements.txt- save your a comprehensive package list to requirement.txtpip install -r requirements.txt- install packages listed in a requirement.txt
2.2 Fundamentals
"""
Multi-line comment with triple quote
"""
# Single-line comment with pound sign (#)

# Importing modules and packages
import numpy as np
import math

# Variable assignment
a = int(42)             # integer
b = 3.14                # float
c = "hello world"       # string

# List
my_list  = [1, 2, 3]    # define a list of elements
first = my_list[0]      # return the first element (0-based indexing)

# Dictionary
my_dict  = {            # define a dictionary
    "key": "value",
    "key2": "value2",
    "key3": "value3"
    }
f = my_dict["key2"]     # return value associated with key2

# Math operations
a+b, a-b, a*b, a/b,     # basic algebra
a**2,                   # exponent using **
a//b,                   # floor division 5//2=2
a%b,                    # modulo (remainder) 5%2=1
abs(a),                 # absolute value
max([a,b]),             # max
min([a,b]),             # min
math.sin(b),            # comes with math module. Similar for cos, tan, atan, etc.
math.sqrt(b),           # or just use x**(1/2)
math.isclose(a,b),      # never compare two floats with ==. Use this instead

# Printing to console
print("hello world")
print(f"value of a = {a}, and b = {b}")
print("alternative method: value of a = {} and b = {}".format(a,b))
print("insert line break with \n and tab with \t")
2.3 Flow Control
# Use 'pass' when you need a blank filler that doesn't do anything
pass

# If statement
if condition:
    pass
elif:
    pass
else:
    pass

# While loops
while condition:
    pass

# For-loop with index
n = len(my_list)
for i in range(n):
    print(my_list[i])

# For-loop by element
for element in my_list:
    print(element)

# Raising exception when you detect an error
if ret_vaue != 0:
    raise RuntimeError('Stopped code. Detected some error.')
2.4 Function
# Defining a function
def someFunction(arg1, arg2, default_arg1=3.14):
    """Doc string explains what this function does, input arg, and return values"""
    a = 1 + 1
    return a

# Calling a function
ret_value = some_function(arg1 = 1, arg2 = 2)

# Asking user for input
user_input = input("User can enter a value. Returns as a string")
2.5 Lists
# Defining lists
my_list = [0, 10, 20, 30, 40, 50, 60, 70, 80, 90]
matrix = [[1, 0, 0, 0],
          [0, 1, 0, 0],
          [0, 0, 1, 0],
          [0, 0, 0, 1]]

# List indexing. Python has 0-based indexing. 0 is first element.
first  = my_list[0]    	        # 0
fourth = my_list[3]    	        # 30
last   = my_list[-1]            # 90
second_list = my_list[-2]       # 80

# List Slicing [start:stop:step]
middle_slice = my_list[2:5]     # [20, 30, 40]
seven_to_end = my_list[7:]      # [70, 80, 90]
up_to_3      = my_list[:3]      # [0, 10, 20]
exclude_last_4 = my_list[:-4]   # [0, 10, 20, 30, 40, 50]

# Advanced indexing
a = my_list[-2]                 # returns second last element = 80
a = my_list[::-1]               # reverses the list [90, 80, 70, 60, 50, 40, 30, 20, 10, 0]

# Find index of an element you're looking for
idx = my_list.index(8)          # Find first instance

# Extending a list
my_list.append('new item')
list1.extend(list2)             # Splice list2 to the end of list1 in place
list3 = list1 + list2           # Returns same as above
list1.insert(idx,val)           # Val is assigned to idx index. Everything else pushed back

# Removing elements from list
my_list.remove(element)         # Remove first instance found
del my_list[0:4]                # Remove a slice from list

# Other useful operations
my_list.sort()                  # Sort in increasing order in place
sorted_list = sorted(my_list)   # Return sorted list
my_list.reverse()               # Reverse a list in place
reversed_list = my_list[::-1]   # Return a reversed list

# List comprehension - automatically apply transformations to a list in one-line
squared_list = [x*x for x in my_list2]
filtered_list = [x for x in my_list2 if x>2]
product_list = [a*b for a,b in zip(my_list1, my_list2)]
2.6 String
# Strings are just list of characters, and can be indexed the same way
mystr = "abcdefghijklmn"
mystr[1]        # returns b
mystr[4:8]      # returns efgh
mystr[:4]       # returns abcd (first 4 letters)
mystr[4:]       # returns efghijklmn (everything after first 4 letters)
mystr[-4:]      # returns klmn (last 4 letters)
"""
The trick is to picture index on the left of char. Imagine boundary line on left
 a b c d e f g h
0 1 2 3 4 5 6 7 8
We want to make cut at 4 and 8. Leaving us efgh

Since string is just a list of characters. The above operation also works on lists
"""

# Other useful string operations for parsing
concat = str1 + str2        # concatenate strings
"word" in string            # checks if "word" is in the string. Returns boolean
string.find("word")         # find the index where "word" occurs. Returns -1 if failed
string.strip()              # removes spaces and \n \t
string.strip(",.abc:;")     # remove occurence of these characters
string.split(" ")           # Split into list of strings at white space
string.split(",")           # Split into list of strings at comma or any other character
string.count("word")        # count how many times substring "word" occured
string.uppercase()          # convert all to uppercase
string.lowercase()          # convert all to lowercase
string.swapcase()           # swap lower and upper case. Vice versa
string.startwith("2020")    # see if string starts with prefix "2020"
string.endswith(".jpeg")    # see if string ends in suffix ".jpeg"
2.7 Dictionary
# Dictionaries are key-value Pairs. Key must be unique, value doesn't have to be
# Creating a dictionary
my_dict = dict()
my_dict['key1'] = 123
my_dict['key2'] = "abcd"

# or define with multiple lines
my_dict = {
    "key1": 123,
    "key2": "abcd"
}

# Accessing a dictionary
myval = my_dict['key1']   # returns "abcd"

# Loop through dictionaries. Order is NOT guaranteed.
for key in my_dict.keys():
    pass
for value in my_dict.Values():
    pass
for k,v in my_dict.items():
    pass

# Other useful methods
my_dict.items()              # Return tuples of all key-value pair
my_dict.values()             # Return all values
my_dict.keys()               # Return all keys
'key' in dict                # Check if key is in dict
my_dict[key1]=None           # If you want to disassociate a value to key
my_dict.pop(key)             # Remove entire key-value pair

# Convert JSON to python dictionary and vice versa
import json
with open("read.json", "r") as file:
    my_dict = json.load(file)

with open("write.json", "w") as file:
    json.dump(my_dict, file)
2.8 Tuples and Sets
# Tuple are just lists that cannot be modified nor appended
myTuple = (1, 2, 3)

# Tuple unpacking - assigning multiple variables with one-line
var1, var2, var3 = 1, 2, 3
def func():
    return a,b
var1, var2 = func()


# Sets are list, but they contain only unique entries
my_list = [1, 1, 2, 2, 3]
myset = set(my_list)             # equals {1, 2, 3}

# Can use intersection of sets or union of sets
item_in_both = setA & setB       # Intersection
item_in_either = setA | setB     # Union

# Other methods
set1.add()              # Append value to set
set1.difference(set2)   # Returns value that only occur in set1 but not set2
set1.issubset(set2)     # Check if set1 is subset of set2
set1.issuperset(set2)   # Check if set1 is superset of set2
set1.discard(set2)      # Discard element from set1 if it exists in set 2
2.9 File IO
import os

# When not specifying any path, file is assumed to be in working directory
pd.read_csv("data.csv")

# When specifying abs path, always convert to raw with 'r' prefix
file_path = r"C:\Users\wcfro\Python\snippets"

# Get current working directory
os.getcwd()

# Get folder path where .py file is located. This is more robust than getcwd()
os.path.dirname(os.path.abspath(__file__))

# Make a new directory
os.mkdir("new_folder")

# Check if directory exists
os.isdir()

# List out all files in the folder
file_list = os.listdir(my_path)

# Get All files of a specific format
png_list=[]
for f in file_list:
    if f.endswith(".png"):
        png_list.append(f)

# Return parent folder "C:\Users\wcfro\Python\snippets"
os.path.dirname(r"C:\Users\wcfro\Python\snippets\file.csv")

# Can call dirname() recursively to get the parent folders n levels up
# This returns "C:\Users\wcfro\Python"
os.path.dirname(os.path.dirname(r"C:\Users\wcfro\Python\snippets\file.csv"))

# Joining path
file_path = os.path.join(os.getcwd, "scripts", "file.csv")

# Reading txt file with iostream
with open('file.txt', 'r') as f:
    firstline = next(f) # skip first line
    secondline = next(f) # skip to second line
    for line in f: # Loop through all other lines
        split_data = line.split() #split line
        Col1.append(float(split_data[0])) #extract column 1 data
        Col2.append(float(split_data[1])) #extract column 2 data
        Col3.append(float(split_data[2])) #extract column 3 data

# Alternatively, read entire file in one go. Get a list of all lines
with open('file.txt', 'r') as f:
    linesdata = f.readlines()

# Writing to File. Good for texts. Recommend using libraries for csv (e.g. pd.to_csv())
with open("my_output",'w') as f:
    for items in mylist:
        f.write('{},{},{}\n'.format(items[0],items[1],items[3]))
3.0 Engineering Example
Let’s do a practice problem: write a python function that calculates the flexural capacity of singly-reinforced concrete sections (\(\phi M_n\)). Here’s all the theoretical background you’ll need to implement it in python.
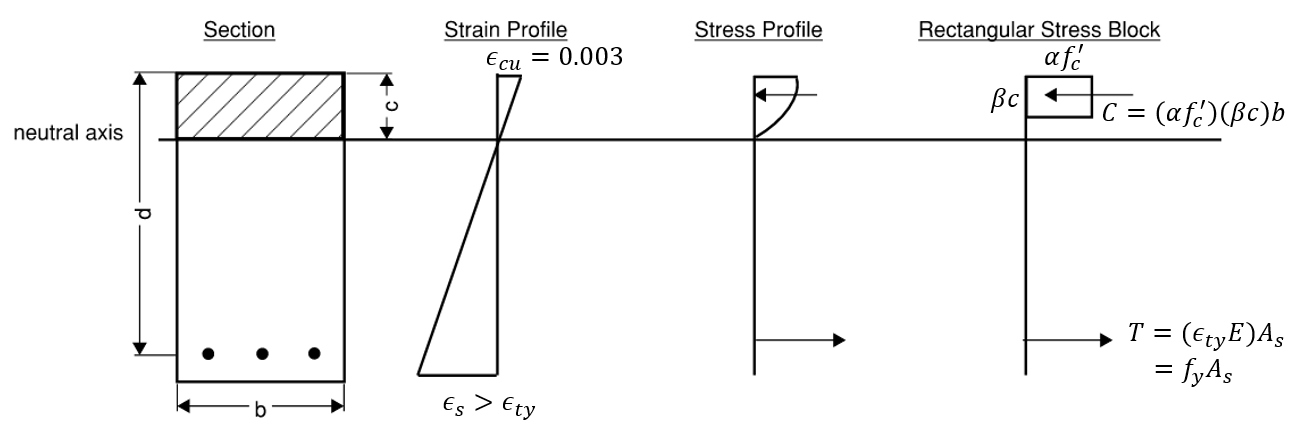
The full expression for moment capacity:
\[\boxed{M_n = f_yA_s (d-\frac{f_yA_s}{2 (0.85) f'_c b})}\]Neutral axis depth:
\[c = a / \beta\] \[\beta = max(0.65, min(0.85, 0.85-\frac{0.05(f'_c-4000)}{1000}))\]Crushing strain of concrete:
\[\epsilon_{cu} = 0.003\]Yielding strain of rebar (grade 60):
\[\epsilon_{ty} = 0.002\]To determine the strength reduction factor (\(\phi\)), calculate net tensile strain based on the curvature. At ultimate condition, we can use the expression below:
\[\epsilon_t = \frac{\epsilon_{cu}}{c} (d-c)\]The strength reduction factor (\(\phi\)) can be one of three values:
- Compression-Controlled (\(\epsilon_{t} \leq \epsilon_{ty}\)): \(\phi =0.65\)
- Transition (\(\epsilon_{ty} < \epsilon_{t} < \epsilon_{ty}+0.003\)): \(\phi = 0.65 + 0.25\frac{(\epsilon_t - \epsilon_{ty})}{0.003}\)
- Tension-Controlled (\(\epsilon_{t} \geq \epsilon_{ty}+0.03\)): \(\phi =0.9\)
Solution:
def calculate_moment_capacity(b, d, As, fpc, fy):
    """
    This function calculates the moment capacity of a rectangular
    reinforced-concrete beam using ACI 318.

    Args:
        b               float:: section width (inches)
        d               float:: section depth (inches)
        As              float:: area of steel (in^2)
        fpc             float:: concrete strength (ksi)
        fy              float:: rebar strength (ksi)

    Return:
        phi_Mn          float:: design moment capacity (k.in)
    """
    # calculate beta factor
    if fpc <= 4:
        beta = 0.85
    elif fpc >= 8:
        beta = 0.65
    else:
        beta = 0.85 - 0.05*(fpc - 4)

    # calculate neutral axis and depth of rectangular stress block
    a = fy * As / 0.85 / fpc / b
    c = a/beta

    # Calculate resistance factor
    e_yield = fy/29000
    et = 0.003*(d - c)/c
    if et > 0.005:
        phi = 0.9 # tension-controlled
    elif et < e_yield:
        phi = 0.65 # compression-controlled
    else:
        phi = 0.65 + (0.25*(et - e_yield))/(0.005-e_yield) # transition zone

    # calculate flexural capacity
    Mn = fy*As*(d - a/2)
    phi_Mn = phi * Mn
    return phi_Mn


# User input
fy = 60 #ksi
fpc = 4 #ksi
b = 12 #in
h = 24 #in
cover = 2 #in
rebar_count = 4
rebar_size = "#6"

# Rebar information stored in a dictionary
REBAR_DICT = {
    "#3":  {"area":0.11, "diameter":0.375},
    "#4":  {"area":0.20, "diameter":0.500},
    "#5":  {"area":0.31, "diameter":0.625},
    "#6":  {"area":0.44, "diameter":0.750},
    "#7":  {"area":0.60, "diameter":0.875},
    "#8":  {"area":0.79, "diameter":1.000},
    "#9":  {"area":1.00, "diameter":1.128},
    "#10": {"area":1.27, "diameter":1.270},
    "#11": {"area":1.56, "diameter":1.410},
}

# calculate rebar depth and area outside
d = h - cover - REBAR_DICT[rebar_size]["diameter"]/2
As = rebar_count * REBAR_DICT[rebar_size]["area"]

# calculate moment capacity
phi_Mn = calculate_moment_capacity(b = b,
                                   d = d,
                                   As = As,
                                   fpc = fpc,
                                   fy = fy)
# print out results
print(f"{b} in x {h} in concrete beam with ({rebar_count}) {rebar_size} bottom:")
print("Design Moment Capacity = {:.2f} k.in".format(phi_Mn))
This exercise covers the fundamentals of python all within the familiar context of engineering calculations. Furthermore, the problem encourages system thinking. Every problem we encounter day-to-day can be solved in an infinite number of ways. How do we find one that is sensible, amenable to future needs, and balances tradeoffs?
For example, here are some of the decisions one must make in this first example: should we pass in the number of bars (e.g. 4 “#3”) or force the user to provide the total area of steel (As)? Should the user pass in 3, “3”, or “#3”? Should we calculate depth inside the function or let the user specify it explicitly (to accommodate cases where user wants two layers or more of rebar)? Perhaps we can calculate the centroid of tension steel automatically? Should we make the function really large and complicated but easy for user to use? Or make the function short and simple but require more pre-processing and understanding from the user? These are all questions that programmers engage with on a daily basis. The individual decisions do not matter in the grand scheme of things, but taken together, they separate good software design that brings joy from frustrating software that you learn to tolerate.
Want more practice? Try repeating the exercise above with an engineering calculation you most often encounter at work. For example: NDS timber design, plate bending, column buckling, and etc.
Footnotes
-
This is especially true in earthquake engineering. Nonlinear response history analyses with dozens of ground motions can take several days to run and generate terabytes of data. There was a brief period in 2010s when people used MATLAB or god forbid Microsoft Access Power Queries, but eventually people figured out Python is the right tool for the job. ↩
-
I love Excel. It is arguably the greatest software ever invented. The strength of Excel is that it is maximally legible, and encourages tinkering - which is an indispensable part of engineering. In addition, tabular form is by far the best way to parse and sort through dense and complex data. Even python-maximalists will often summarize results in pandas dataframe or export to csv or xlsx. And most engineering software eventually build some form of spreadsheet feature. When you become proficient in Python, every problem you encounter becomes “Python-shaped”. Why spend 1 hour doing something slightly inefficiently in Excel when you can spend 6 hours failing to automate it in Python. ↩
-
“Claude, design this building, make no mistakes. Stop asking me questions and just do it.” ↩
-
Similarly, you don’t need to know the intricacies of the internal combustion engine to drive a car ↩